javascript templates with moustache and icanhaz.js

Templating is an important part of the view side of model/view/controller architecture. In fact, most web apps are really model-template applications. In the old days we used to print out html that was generated by hand. You started with something like:
print "Content-type: text/html\n\n";
And it got worse from there. You were sunk if you forgot that second newline. Templating was a problem that had to be solved early on and now we have files with snippets of html and tokens to be replaced. Typically, they have a syntax like:
	Hello, 
If you pass the template a user object with a name attribute the token would be replaced with the correct information and rendered into useful html without much fuss. As we move more of our application logic into the client side to be executed in the browser, a javascript templating engine is necessary. I have used jstemplate with success, but it shoehorns the template structure into html tag attributes which makes it difficult to read and understand. I much prefer curly bracy tokens. People seem to like the jquery template plugin, but it doesn't have a great method for packaging templates and it looks like you have to store them as js strings. That isn't bad, but for multiline templates you have to escape newlines which leads to ugly code. mustache is an awesome templating engine with support in many languages including javascript. Someone went to the trouble to create an excellent method of loading templates and wrapped mustache.js into a package with a slightly silly name called icanhaz.js. Icanhaz makes it almost painless to retrieve and render template assets. The icanhaz.js website has an awesome introduction and it is simple to use. Lately I have been finding that the best way to wrap my brain around a new topic is to write some unit tests. Ideally I would like to use mustache templates with backbone.js, so I am going to build on the tests from my last entry by incorporating icanhaz.js. First let's grab the code from github and sock it away into our project. I'm not spending too much time with the layout for this test, so I'm just going to drop the icanhaz.js into the src folder.
git clone git://github.com/andyet/ICanHaz.js
cd ICanHaz.js/
cp ICanHaz.js/ ~/project/src/
Now we add a reference to this file to SpecRunner.html, so that the library loading component looks something like:


Note that the order of loading these scripts is important because these libraries are dependent on each other. Icanhaz requires jquery, so we're going to load it as well. Honestly, jquery is nice to have for any project. Loading it from google is nice and fast. If you fear the cloud, you could load it locally as well. For simplicities sake I am going to start with loading a template from a string and giving it a javascript object to render. This method isn't covered quite as well on the icanhaz.js website, but it's a useful starting point for understanding the basics of mustache. Let's add a test:
describe("icanhaz templates", function() {

it("should be able to load template", function() {
ich.addTemplate('model', '
'); var snippet = ich.model({name: 'Alf Prufrock'});
expect(snippet.html()).toEqual('Alf Prufrock'); expect(snippet.text()).toEqual("Alf Prufrock"); }); });
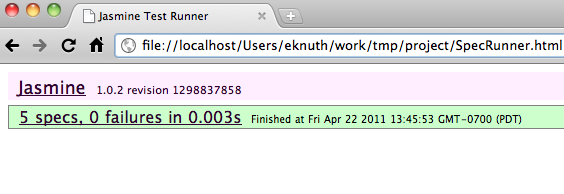
This code uses the ich method addTemplate to build a template named 'model' from the given string. This template names becomes the name of a method on the ich object which takes an object or object literal containing the values to be interpolated and rendered as html. The return value is already a jquery object, so we can use the html() and text() directly. Notice that the html of the rendered template doesn't include the surround div that we passed to icanhaz. This template can be used any number of times to render this little bit of html. It could also be an entire web page or even bits and pieces called partials. When we load SpecRunner.html, all tests pass, so we know that the code is doing what we think it should be doing.

getting started for tdd using jasmine and backbone.js

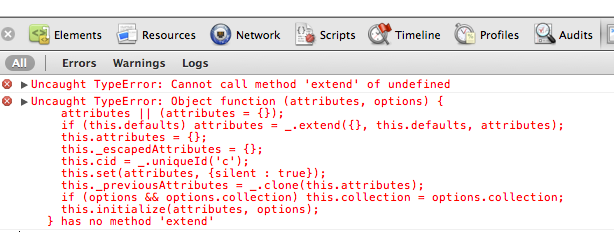
Developing in javascript is a fun and exciting process.  Debugging code in the browser using firebug can provide instant gratification.  Good test coverage is a must when the code you write could potentially be executed in any number of platforms. Writing unit tests isn't always a priority and peace of mind can be hard to come by, but one way of dealing with the uncertainty is to practice test driven development.  Using this style means that you write the test before the code and theoretically everything you write already has test coverage. This makes it less stressful to maintain and refactor your codebase. Behavior Driven Design is an extension of this philosophy that provides a higher level understanding of what can be expected from the code you write. You still have to write unit tests, but they are attached to specifications of the behavior.  There are many frameworks for TDD and BDD and I am going to explore jasmine, which is a more recent addition to the javascript testing world. I am also interested in checking out backbone.js, which is a MVC style framework for writing javascript applications.  Most developers are familiar with frameworks like django and rails for writing traditional web apps in python and ruby.  For those of us who are interested in providing more a more dynamic experience, javascript is the language of choice.  It also makes sense to farm out the workload to user's computers rather than wasting valuable server side processing power. Setting up jasmine to work with backbone.js is fairly straightforward.  I did run into a few snags and I thought it might be useful to document the process I went through.  I'm assuming you are using a mac or linux computer and are familiar with the command line. First download the jasmine testing framework.  We need the jasmine standalone distribution. mkdir project; cd project curl -O http://pivotal.github.com/jasmine/downloads/jasmine-standalone-1.0.2.zip unzip jasmine-standalone-1.0.2.zip rm jasmine-standalone-1.0.2.zip This creates the basic jasmine framework in your project directory. You can run the sample tests by opening the SpecRunner.html file in any browser.  This file is where you specify the javascript libraries that you would like to load as well as your own test and production code. The light is green and all tests pass.  Congratulations! Inside the project directory that we created there are subdirectories called src and spec.  Src is where production js files go and spec is where we will store our test code.  Right now there are sample files in place which you can use as an example for the new project. Let's create two files, "src/app.js" and "spec/spec_app.js". These sample files are loaded by modifying SpecRunner.html to look like this: If we reload SpecRunner.html, there will be no failures because we have not actually added any tests at this point. The first step in TDD is to write a test that should fail and then write just enough code to make it pass. For this example I am going to start creating a backbone.js model. There are a few introductory backbone.js tutorials, including this one by the antipodean Thomas Davis. For simplicity's sake, I'll be following this more barebones guide. Let's create our first test in src/spec_app.js: describe("backbone", function() { it("model should have name", function() { model = new Model({ name: 'Model A'} ); expect(model.get('name')).toEqual('Model A'); }); }); Reloading SpecRunner.html will give you the following result. [caption id="attachment_358" align="aligncenter" width="721" caption="Model is not defined"][/caption] The fact that Model is not defined shouldn't bother us because we haven't written code to define it, yet. That would be the next step. In src/app.js, add the following line to start stubbing out our first model: var Model = Backbone.Model.extend(); Unfortunately we still don't have a passing test. We have not yet incorporated backbone.js into our project, so the code we are calling does not exist, yet. To fix this problem we download a copy of backbone.js into our src directory with the following commands. wget http://documentcloud.github.com/backbone/backbone.js mv backbone.js src Now we will edit SpecRunner.html and add a reference to this new file. Since we are confident that our test is being executed we can remove the example files and references from SpecRunner.html. It should look like this: Now we can reload SpecRunner.html and see if our test passes. Unfortunately we still don't have a green light. We can get more information by opening the javascript console. This is a great way to troubleshooting fail tests because you can see console logs and debug the code interactively. Here is what showed up in the console after executing the test. The error is: "Uncaught TypeError: Cannot call method 'extend' of undefined". Unfortunately backbone's model code seems to be missing the extend method, which is unfortunate as our code relies on it. Fortunately other people have this problem and it has been hashed out on stackoverflow. Bonebone.js has a dependency on underscore.js, an awesome little utility library. So let's grab a copy of that and add it to our project like we did with the backbone.js file. wget http://documentcloud.github.com/underscore/underscore.js mv underscore.js src We also need to add a reference to the library in SpecRunner.html, which should have lines that look like this: Now when we reload SpecRunner.html to run our tests we finally see some green. We have our first test passing and a framework for building a robust dynamic javascript application using a modern MVC framework. The test first method requires some discipline but ideally ought to keep you from getting angry calls in the middle of the night. This example project can be cloned from github for your enjoyment. git clone git@github.com:eknuth/jasmine_backbone.git

pdxhash and working with spatial data using sql

Overview

After analyzing the data, it would appear that we can use the geohash algorithm to geographically locate things in the Portland area by a short combination of letters and numbers. Because we only care about locations in and around Portland, we can throw away the majority of the geohash.  What is left of this string can be used to geotag locations and should fulfill that requirement of the #pdxtags civicapps challenge idea. It would appear that we can identify areas in Portland  as small as individual houses with just 5 characters, like 06ytd or 03qrf. The interesting thing about this approach is that it eliminates the need for PostGIS or other spatial database when building applications with the civicapps data. Using a pdxhash to store locations would allow a programmer to do fast geographic lookups and basic spatial queries in Portland area, without a geodatabase or GIS software. It would also allow the use of non traditional application servers like the Google App Engine or NOSQL databases like Mongo or CouchDB.

Massaging the Data

Now that we have the Portland metro area address points loaded into a postgis table, we can begin working with the data.  We will be doing gis operations at the SQL level.  People commonly use ArcGIS Desktop to do analysis and data management tasks like these, but the open source tools work just as well.  There are more GUI based open source methods to do what we are doing, but if you are interested in automating tasks and scripting, the command line rules. The table schema in postgis matches the csv file which we loaded with ogr2ogr. The import added a column named wkb_geometry that contains the point in postgis' binary representation of a coordinate. The table contains 316,133 records that look a little like this: select wkb_geometry, street_name, zip_code from address_data limit 10; wkb_geometry | street_name | zip_code 0101000020E6100000D1C25823EAC262C045CEAEC8C8C04340 | LAMBERT | 0101000020E6100000D1C25823EAC262C045CEAEC8C8C04340 | ASHBY | 97229 0101000020E6100000D1C25823EAC262C045CEAEC8C8C04340 | 2ND | 97080 0101000020E6100000D1C25823EAC262C045CEAEC8C8C04340 | CERVANTES | 97035 0101000020E6100000D1C25823EAC262C045CEAEC8C8C04340 | 40TH | 97123 0101000020E6100000D1C25823EAC262C045CEAEC8C8C04340 | PARK | 97201 0101000020E6100000D1C25823EAC262C045CEAEC8C8C04340 | DOLPH | 97219 0101000020E6100000D1C25823EAC262C045CEAEC8C8C04340 | 15TH | 97030 0101000020E6100000D1C25823EAC262C045CEAEC8C8C04340 | 48TH | 97213 0101000020E6100000D1C25823EAC262C045CEAEC8C8C04340 | 182ND | 97233 (10 rows)

Putting the Data on a Map

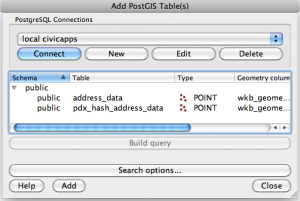
If we fire up qgis and add this postgis layer, we can view all of the points on a map. We can symbolize the points based on the attributes in the table. For example we could make points have different colors based on their county. I'd like to visually differentiate the points based on their #pdxhash, which is a masked version of a geohash. Unfortunately the querybuilder in qgis doesn't allow you to get too fancy with sql functions, so we have to create a view. A view is a little like a layer definition in ArcGIS. It allows us to create a virtual table that hides our more complicated queries behind what looks like a simple table. In our psql or pgadmin window, we can define the following view. create view pdx_hash_address_view as select substring(trim(ST_Geohash(wkb_geometry)) from 0 for 5) as pdx_hash_4, substring(trim(ST_Geohash(wkb_geometry)) from 0 for 6) as pdx_hash_5, substring(trim(ST_Geohash(wkb_geometry)) from 0 for 7) as pdx_hash_6, substring(trim(ST_Geohash(wkb_geometry)) from 0 for 8) as pdx_hash_7, wkb_geometry, ogc_fid from address_data; qgis postgis layersWe need the wkb_geometry and ogc_fid data to provide our actually features and a primary key to keep things sorted out. Now we can go to postgis and pull up this layer just like we did with our original table.  However it becomes obvious that the view is much slower than our original table.  When we select our view we are doing multiple complicated operations on each row in our table.  Fortunately postgresql offers us a way to easily "materialize" this view into it's own table. select * into pdx_hash_address_data_table from pdx_hash_address_view; create INDEX pdx_hash__address_data_table_geom_idx on pdx_hash_address_data_table using gist (wkb_geometry);

Creating New Layers

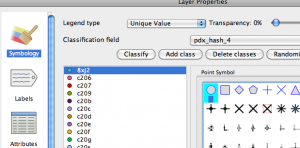
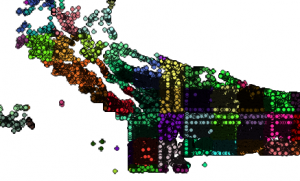
When we use SELECT INTO, our new table is created automatically from the schema of our old table or view. Now instead of complicated function calls, our pdx_hash columns are simple text fields and our query is much faster. We also need to add a spatial index to this new table, so our operations on the points are speedy as well. Now when we bring this layer into qgis, we can see the pdxhash attributes we have added and it is fast enough. We can symbolize the layer based on the pdx_hash_4 field. Immediately we can see that the main part of Portland is really represented by four of the pdx_hash_4 classes. pdx_hash_4 If we symbolize the data based on 108 pdx_hash_5 classes, we get a more interesting picture. Unfortunately when dealing with all of these points, it gets a little jumbled. However the map seems to validate using a 5 character pdxhash to break down the Portland area. pdx_hash_5 It would be nice if we could convert our points into polygons that represent each pdx_hash zone. It would make our map a little more visually effective. Right now it is hard to see the forest for the trees.

Common Table Expressions and Spatial Aggregates

One problem with working with a large dataset is that some operation can take a long time, especially when you make mistakes. In order to convert our point fields into polygons, we have to use postgis aggregate functions which behave like standard sql aggregates like max, sum, average only for geographic features. It would be nice to work on just a subset of our data while we get our statement correct. We could create a new table with a limited subset of the address data records, but more recent sql implementations support something called a common table expression which will do that for us.

Creating Polygons and exporting Shapefiles

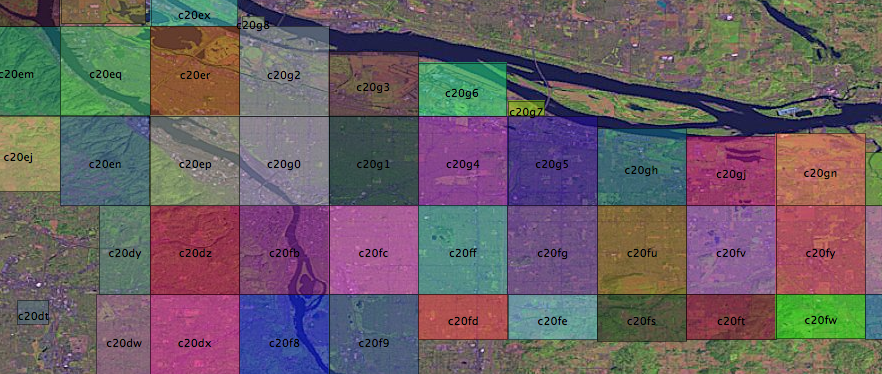
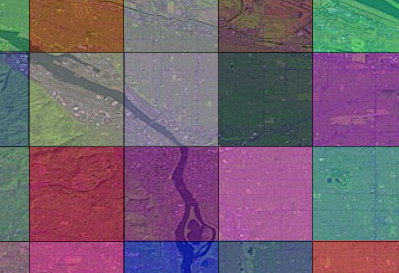
Using the WITH statement, we create a virtual table with only 10,000 records on which to perform our query. This is much faster for some operations than working on our entire dataset. When the query is solid, you just remove the "LIMIT 10000" from the common table expression and you are ready to go. As it turns out postgis can generate polygons from our point fields very quickly when the query is correct. with pdx_hash as (select * from pdx_hash_address_data_table limit 10000) select pdx_hash_5, ST_Envelope(ST_Collect(wkb_geometry)) as geom, count(*) into pdx_hash_polygons from pdx_hash group by pdx_hash_5; This query takes all the points which have the same pdx_hash_5 field and returns them on a single row using ST_Collect. The ST_Envelope function creates a polygon from the edge of the field of points. As you can see our, polygons enclose the regions defined by the pdxhash points in our previous queries. It also would appear that all these blocks begin with a pdx_hash of c2, which means that we can uniquely identify each zone with just three characters. I've made some shapefiles for you to play with. The highest precision shapefile reveals the limitations of basing the polygons off of the address data. However, I don't beleive it invalidates the concept. I created the shapefiles using ogr2ogr.   I did this example on a mac with postgis/postgresql, but you could execute basically the same queries with Microsoft SQL Server 2008. ogr2ogr -skipfailures -nlt POLYGON -f "ESRI Shapefile" pdx_hash_polygon PG:"host=localhost dbname=civicapps" pdx_hash_polygon pdx_hash_polygon.zip

.